

A few days ago I shared with you a post with many a shot from hiking to Trolltunga. Norway has so many beautiful landscapes that it is hard to imagine how a country could have such amazing scenery all to itself. Our drive from Bergen to Odda, which is the starting point to the little expedition that is the Trolltunga hike. All along the way, the road trip from Bergen to Trolltunga had us oohing and ahhing at waterfalls, lakes and beautiful mountains. A lot of people want to hike to Trolltunga, so I thought I would make my second post on a Guide to Hiking to Trolltunga a Q&A of what you might want to know when planning a trip for this hike.
What the heck is Trolltunga anyway?

Trolltonga is a miracle of nature that literally means the 'Trolls Tongue'. Hopefully, my previous post answered this one but if still unsure, read on. Trolltunga is one of the most spectacular scenic cliffs in Norway. Trolltunga is situated about 1100 meters above sea level, hovering 700 meters above lake Ringedalsvatnet. The view is breathtaking. The hike starts in Skjeggedal and goes through the high mountains, takes 10-12 hours (23 km in total to Trolltunga and return) and the ascent is about 900 meters.
What's the hike like and what can I expect? - (Do you think I can handle it, Am I fit enough?)

The hike is 11km up and 11km down so a total of 22km for the whole trail. They used to have the funicular that made the first and last 1km a lot easier - alas it has been shut down a long time ago and the trail the cable car went on is now blocked off and it is too unsafe to use. This means that you now have to climb up the 1km with your own two feet. Let me tell you this: the first 1 km is the hardest part of the trial especially if you are carrying a heavy backpack! Your feet will be swearing at you all the way through the 1km BUT when you do see the 1km sign at the top you will be surprised where that little burst of energy comes from for the little happy dance that you will no doubt be doing. The trail between the 1km sign and the 2km sign is fairly flat. As far as the first 1km is concerned it is a mix of stone steps and steep inclines with a rope to support you. The last 1km down is also a lot harder to do on the way down than it is going up. Having done 21km your legs will be a bit wobbly for the big stone steps down in that last 1km. Saying that you will be on such a high with encouragement from other walkers that it won't seem as bad as I am making it out to be. As a rule of thumb if I did it so can you!


How long does it take?

This really depends on your fitness levels. You will see some breezing through the trail as if it is a walk in the park and some that are taking each step as it comes. I was not the fittest one out there, I found it hard at times. I slowed down at some spots and picked up the paces on the flat areas. The part that takes the longest is the starting point as it's a very steep 1km but starts to level out as you get higher. You have spots that incline but this is a lot more gradual than the start. The next 3km took us about 2 hours if I remember correctly. We set off around 4 or 5 pm. When we reached the 4km it was around 7 pm. We set off late in the day because we knew we were going to be camping overnight. We camped at the 4.5km mark and woke up at 6 am to restart our hike. Weather, fitness and Equipment play a role. Also, bear in mind that how long it takes you will also be determined not just by your fitness level but by weather as well. It had rained heavily during the day hence part of the first 1km was covered in mud with some of the trail somewhat challenging as you had to pick and choose where to place your foot on almost every step. Make sure you bring hiking shoes with you. This is also one of the reasons by you need a spare set of socks. You need to be careful and ensure to take easier alternatives during challenging parts of the trail. I imagine such a hike would be just as difficult after or around the time of snowfall. There were some muddy patches in other parts of the trail but it was fairly simple to navigate those as the incline was not a concern. Just make sure you check the weather update leading to your trip. This will help you figure out what sort of weather patterns to expect as well as what to pack. For day hike it can range from 10-15 hours on the trail. This all depends on your fitness and the time you hike as I said. For the day hike you also need to make sure you set off early enough for the start of the hike.
Also, note that the time it takes to climb down is almost the same as the climb up so factor that in if you are using public transport.

When Is the best time to visit?
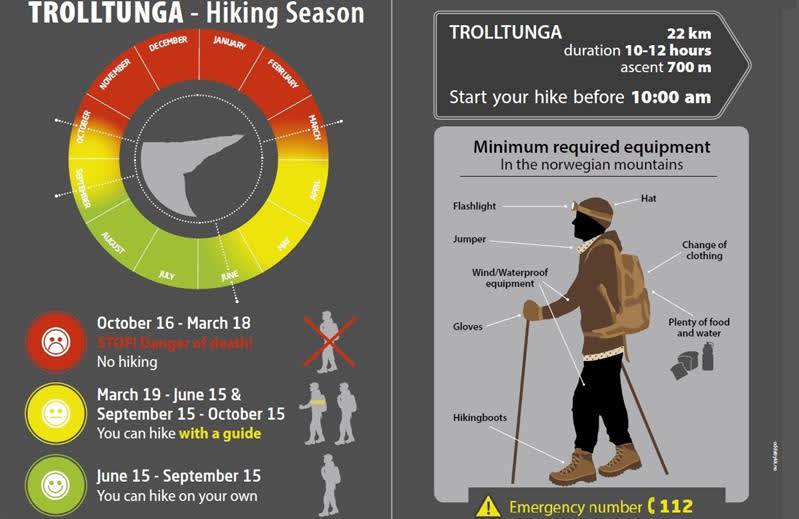
Whatever time you visit be sure you are equipped for the hike. I will post tips on what to pack below. Whatever you do, do not attempt to climb Trolltunga in the winter time (unless of course, you have Everest under your belt - Trolltunga should be a breeze). Also from Mid March, it is still covered in snow and the only people taking on the trail are those on a guided tour with Trolltunga Active guides. It was hard enough doing the trail when it's covered in mud in August. I wouldn't dare an attempt it the winter. The best time to visit or hike to Trolltunga is between June and mid-September. We hiked towards the tail end of the hiking season. We were there the last weekend of August as it was part of an adventure weekend birthday present to my boyfriend, now fiancé.
What happens when you get to Trolltunga or on the tongue itself?

Once you arrive a the top of Trolltunga you have to go down via a few metal steps and this is where the queue to Trolltunga starts. The rest of the crowd are scattered around the area taking pictures and congratulating each other for making it that far. The majority stay there for an hour or 2 before heading back down. Note that there is a queue to get on the tongue itself. When I climbed down to queue the queue was about 30 minutes long but during the peak periods, I have heard it can go up to 2 hours. It does go quickly though as you have people doing all sorts of stuff on the tongue that will keep you entertained as time goes by. From people stripping naked to marriage proposals, it all happens in Trolltunga!


Do I have to sit on the edge, is it scary?

No, you don't have to sit on the edge. Plenty of people don't. It's really up to you and how well you deal with heights. I had every intention of sitting on the edge but didn't know if I was going to actually do it. I was going to sit there on my own and my boyfriend was way on the other side with instructions to take as many pictures as possible. Only until it was my turn to walk on Trolltunga did I just press the 'fuck it' button and say it's now or never so put you big girl panties on and let's fucking do this. That is usually my pep talk when I am doing something that freaks me out, whether it's a scary meeting at work or rock climbing somewhere. So I sat down first and inched myself to the edge and then stuck my legs out. It's as easy as that! I wasn't going to leave without taking a selfie!!

Do I need a guide/Can I hike alone?

No, you don't need a guide, especially if you are hiking to Trolltunga within the safe seasons when there is hardly any snow. We hiked as a pair but did spot solo hikers. Both male and female solo walkers. You will still have plenty of people along the way to talk to. We camped at a spot in Odda before our hike and recognised quite a few faces from the camping site in Odda who were finishing the trail as we were starting. These guys started off around 6 am and were heading down by 7.30pm when we were reaching the 4.5km mark. So, to answer that question. No, I don't think you need a guide as the trail is very well marked and maintained. We didn't have a guide. I did, however, do an incredible amount of reading before planning the hike. I would happily do Trolltunga alone but bear in mind that it's a difficult hike and needs not just physical strength but mental strength too which is a lot easier if you have a hiking partner with you to cheer each other on. Make sure you plan your trip well and that you have all the equipment needed and that you have the latest weather forecast. Once you are up on the trail it is an amazing slice of wilderness to raise your soul to new heights. The entry ticket is being prepared.
Celebration at the summit?
Hell yeah! You have just done 11km on you own two feet, why not celebrate. Shortly after the celebration it soon sinks in that you have to do another 11km back down. Although, its not as bad as most of the up hill buttle is over and done with.

Celebration at the summit?
Hell yeah! You have just done 11km on you own two feet, why not celebrate. Shortly after the celebration it soon sinks in that you have to do another 11km back down. Although, its not as bad as most of the up hill buttle is over and done with.

What facilities can I find at the base?
Both cars parks have toilets. The first one has a toilet and a little shop. The second car park at the Skjedggedal where the hike begins has the car park, toilet, and a cafe. Note that the cafe doesn't open early so don't bank on getting food here for the hike. Bring snacks with you.
Are there any toilets along the trail?
No sweetheart, it's just you and mature nature!
How do I get there? Is there parking?
We arrived in Norway via Bergen. I shared a post recently on what to see and do in Bergen. From Bergen we rented a car, actually, we rented the car from the airport. I also shared some tips on car rentals in that post. We drove from Bergen to Odda. By the time we arrived in Odda is was early evening. We had pre-booked at the campsite in Odda. We camped overnight in beautiful Odda. I will share a post soon on this beautiful little town soon. In the morning made our way to Skejeggdal, the starting point of the hike. There are two parking sites when you arrive at Skejeggdal, one is the information site. The second is elevated high up the mountain just where the actual trail starts. If parking at the top has run out you will be asked to park at the first parking lot and then take the free bus to the second car park. We parked our car in the first car park and took the bus up. Boy, was I glad we got the bus! The road up to the second car park is one lane in most parts, the bus had to manoeuvre in tricky parts and guess what, you only have a bit of a barrier between the bus and meters and meters of a deadly drop! So yeah, I was glad it wasn't us in the driver's seat! There were points where the bus had to reverse back to make room for another car to pass in what is already a narrow and dodgy cliff edge road. I am a lover of heights but this road had me on high alert that I actually forgot to record the journey. So, yeah there is parking! We were also parked overnight in the first car park. If you are hiking and leave your car in the first car park just make sure you know when the last bus is so that plan to get off in the right time. Otherwise, if you are parked on the top level car park next to the trail then you only have to worry about the drive back on the crazy cliff road in the dark.
- Coins for parking – Parking in Skjeggedal is 200 NOK/day or 100 NOK in Tyssedal. The machines don’t take notes so take coins or a bankcard. We paid cash to the car park attendant on site when we arrived and parked in a different spot to the day hikers car park.
If you are coming via public transport, there are buses from Bergen that take above 3 hours to Odda and from Odda you can either take a shuttle bus to Skjeggedal. If you are staying in Odda check with your place of accommodation if the shuttle bus picks up from your hotel or campsite.
Day hike Vs overnight hike
For the day hike, you have to be on the trail nice and early. The latest time recommended to start is 8 am, in the summer months when it gets dark later in the day I think you can push this until 9 or 10 am. Just bear in mind that you definitely do not want to do the last 1km in the dark. Some spots are steep and challenging even in daytime. When you pack your equipment be sure to pack a torch regardless whether you are a day or overnight hiker. For the overnight hike, we started off late in the afternoon. Again, make sure you don't set off when it's dark as you need decent visibility for the 1km up the start of Trolltunga trail. If the car park is full at the top then you need to factor in the bus ride up to the start of the trail. If you start off after the bus running times end then you will either have to face adding 2-4km of walking to the starting point of Trolltunga trail or face canceling your hike for the next day. If I had to do it over again I would still go for the Overnight hike as I like the camping in nature side of it and the views were out of this world amazing without a whole host of people on the trail. One thing to add is that if you are going for the overnight hike then that is an addition of camping equipment you have to carry with you on an already hard hike.
Are there hotels near the hike starting point?
Are there hotels near the hike starting point?
We stayed at a campsite before we set off for our hike. If you want to stay at a hotel, guest house or rent an apartment you need to do that well in advance as there aren't a lot of places nearby. When we tried to book, a lot of places had already sold out that were nearby. Also bear in mind that there only about 5 places within 10mins of the starting point. The list hotels and guesthouse can be found here. Book early! Otherwise, your second option would be camping in Odda.
Can you camping before your hike - Camping in Odda

When heading to Norway for a hike to Trolltunga, you will most likely have to stop by Odda before heading to your hike. Odda is a beautiful little town and actually quite a few walking trails to ease you into the mother of trails in the region that is Trolltunga. In Norway, you can camp anywhere on public land but on this trip, I wasn't about to start hunting out which spots I can and cannot camp on. I sought out to research on camping sites in Odda and we found one. Odda has ridiculously beautiful views that we decided to camp right on the edge of the lake. We camped at Odda Camping and left later on in the day to head to Skegjjedgal, the starting point of Trolltunga.
What to pack:
I may have a lot of items on my bucket list but dying of hypothermia on a top of a mountain ain't one of them. Pack wisely if dying a cold death is not part of your wanderlust plans. The temperature up on the mountain can drop without too much warning. I shared a post a while back when I went hiking in Snowdonia and it lists some tips on hiking as well. Below is a guide to things you should considering packing:
Day hike pack:
- Food Pack with energy snacks. We made granola bars before we left. So make sure you pack protein and high energy snacks as the hike is long and arduous. A good 10+ hours of walking should be considered for each day.
- Gloves: I have a light and a heavier pair depending on the weather.
- Thermals: Weather change can be sudden. Layers will keep you warm but also easier to slip off when it gets warmer.
- Hiking Boots: We saw so many people hiking in trainers, converse and I think I even spotted someone in flip flops which were not really suitable for the terrain or the hiking in general. Just like you wouldn't do a marathon in hiking boots, so pack accordingly for the activity you are embarking on. Hiking boots for me are a lot more comfortable and are built for the terrain.
- Walking Poles - You will thank me!
- First Aid Kit - Because accidents can happen.
- Head Torch: A lot easier as they keep your hands free.
- Hat: The higher you get the more variable the temperature becomes. The hat will help to keep your body warm. Especially at night time if you are camping overnight.
- Sunscreen: It was cold when we set off the hike but when we got to the summit at Trolltunga the sun was out and it was intense so bring some sunscreen to protect yourselves.
- Camera - This is an obvious one as the views are so beautiful you won't have time for Instagram but you will want to capture the beautiful landscapes in Norway.
- Phone: There no reception along the trail so any calls or weather updates will need to be done in the car park. You will need your phone should anything happen you would be able to send a text. Numbers below for emergencies Make sure you bring battery chargers.
- Charger blocks: Lithium batteries in phones tend to lose their charge quickly in the cold, so to make sure your phone is a charge should you need to make an emergency call.
- Contact details for emergency services in Odda.
- Water Bottle or Water Camel: You only need the first bottle and on the way, there are many water streams along the way where you can refill.
- Mountain whistle: Hopefully nothing happens but this one should be packed in your first aid kit. Should anything happen, you may need this to draw attention to where you are located if you get stuck or injured.
- Spare change of clothes and at least 2-3 pairs of socks: Leave the spare change of clothes in the car but take an additional pair of socks with you.
- Plastic bags: There are no rubbish bins so don't be like some of the people who have left piles of rubbish close to the summit. Some large groups get to the end of the hike and have food as they celebrate the end of the hike. It appears many leave their rubbish in the last 2km of the hike. There are no cleaners on the trail so be kind to the environment and bring your rubbish back down to the car park with you. Plastic bags will also be handy to put your dirty clothes in from the hike.
- Map and Compass and not really needed on this hike as the trail is clearly marked. If you veer off course then they might be handy. On this trail though you don't need them.
- Wipes/Tissues for when nature calls or just cleaning hands after eating or general hygiene.
- Waterproof Jacket/hiking trousers.
Overnight pack: Include these to your day hike pack:

- Tent - Also make sure you have practiced putting up the tent. I have had to help a few people put their tents up who came camping with new tents they had little knowledge of putting them up.
- Sleeping Bags
- Sleeping Matt: It helps to have something between you and the ground as it gets cold and frosty at night.
- Camping stove and plastic or paper crockery
- Food: If camping overnight it helps to pack some items from home. We packed some tea bags, sugar, and the rest of the food to cook overnight we bought when we were in Odda.

Tips on hiking and more equipment:
More can tips and equipment can be found in my previous post on hiking in Snowdonia.
Can I camp on the trail to Trolltunga? If so, where?
I searched and scoured the internet for the answer to this questions but could not find any details around this. Yes, you can camp anywhere on the trail, that is apart from the last 3kms. People being people, they disobeyed the rule from what I could see with a few tents in the last 3km of the trail to Trolltunga. I don't know the reasons why you are not allowed to camp in the last 3km, all I know is that there is no way I was going to be hiking all the way up to the top with all my camping gear on my back! Camping anywhere else one the trail is fine. There isn't a lot of shielding from the mountain winds. It gets really windy and cold at night so layers and thermals are your BFF! Pack accordingly. Apparently, they tend to have quite a few rescues on the trail and we had quite a few helicopters fly past at night in what we hoped would be a quiet and serene place to chill. I put that down to helicopters flying in for rescues. You don't want that to be you, so pay attention to the warnings and pack all or some of the items above if you are planning to spend the night. As far as camping is concerned on our hike, we found a spot to pitch our tent on the Trolltunga trail. Once we pitched our tent, got some food going and chilled out with a little wine and a view - it was a birthday celebration after all- we had a great time! The views were breathtaking. It was the first time I spent such quality time up a mountain. It was after we chilled out that we decided that in the morning we would leave our tent as-is and continue the hike with just food, camera, first aid, torch and all the smaller necessities. Once we finished our hike, on the way down, at the 4KM point we found our tent and took it down to finish the last leg of the hike. We weren't the only ones with this idea, a few people left their tents on the trail.


Travel insurance!
Never skimp on Travel insurance. So many times in facebook groups I read about people thinking they don't need it. Unless you are psychic just don't travel without it. Especially when doing activities like this. Be sure to check the insurance includes outdoor activities like this.
Who do I call in an emergency - Mountain rescue?
Even when you have no reception for normal calls, you should still be able to great through to emergency services. A majority of countries use 112. For Norway and UK, you can dial 112 for mountain rescue. For other countries refer to this table. Just make sure you do your research before your hike to make sure these numbers are still the same.
Pin For Later

I live near Trolltunga and girl, this is SUCH a good guide! So many tourists don't take this hike seriously enough, so it's great to read all of your helpful tips for people wanting to do it!
ReplyDeleteThank you! Glad you found it informative.
Deletegreat tips! It's on my bucketlist but I've had a ton of questions and concerns about it, I think you answered all of them. Stashing this one away to refer to!
ReplyDeleteThis is one of my MUST NEED TO DO items on my bucket-list!! Plus, just visit Norway in general lol. I'm definetly bookmarking this trip for when I do this hike - plus I'm checking out all of your other guides on Norway!
ReplyDeleteSuch a helpfull post! You really answered some important questions. I haven't done Trolltunga myself yet but I'd love to - especially if it involves camping! Gonna check out your other Norway posts. :)
ReplyDeleteBeautiful scenery! This is going in my bucket list. I love how incredibly beautiful the whole thing is. Just wow. I've traveled alone on most of my trekking and camping trips and this is a trip I would plan and save up for. For those who love to go solo, it's all good - just make sure to take precautions and be proactive in everything. Never second-guess. For more tips on hiking alone, see this link: http://backpackingmastery.com/skills/tips-for-hiking-alone.html
ReplyDeleteGreat Post! I was wondering if you had any knowledge about renting camping gear near trolltunga? I can't seem to find any information about this online!
ReplyDeleteI am afraid not. We went with our own staff. There might be some shops you can do that at in Bergen where majority of people arrive from.
DeleteThis is the most informative post I have seen yet! My partner and I are planning on trekking Trolltunga in July 2018. You mentioned no camping in the last 3km of trail - does this include no camping at the top? We were planning on camping overnight at the top as I heard a few people do? Thanks!
ReplyDeleteThere are signs that say camping is not allowed in the last 3km. That could possibly because of safety, as it get super cold there with hardly any shield from the wind. Also if you are going to camp in the last 3km then why bother camping at all instead of just doing a day hike. This is not to say that people dont camp in the last few km to the top. I guess you do so at your own risk really. It is a beautiful route. If you are going to camp I would suggest the half way mark so that you can leave your gear and pick it up on your way back like we did. You can leave the tent pitched and any other unnecessary weight ie cooking stuff etc. Hike up to the top with less weight and then collect it on the way down and finish that way. Either way, hope the post was useful to you and enjoy your hike to Trolltunga when you do visit :)
DeleteThanks
ReplyDelete